 This isn't an advert but this is a brilliant website. It is essentially top 10's based on every imaginable topic, around three new lists are posted daily. Some of these lists are beyond primary aged children's comprehension and some of the topics are not appropriate for the age group. However, there are many lists that are brilliant lesson starters, useful fillers and imagination stimulators. Some of this lists I have used in these ways include :-
http://listverse.com/2012/12/03/10-images-of-where-children-sleep-around-the-world/
I used this during a PSHE lesson and this really resonated with a group of year 4 children.
http://listverse.com/2008/12/22/top-10-international-christmas-dinners/
http://listverse.com/2011/06/19/10-differences-between-the-north-and-south-poles/
I used these two during my guided professional placement as quick 'fillers' a week or two prior to Christmas.
http://listverse.com/2007/07/13/top-10-most-deadly-animals/
I have used this as a basis for a lesson as part of a habitats topic and also as a standalone lesson.
Have a nosey around and maybe find some inspiration!
Alot of anxiety surrounds ICT in teaching due to the potential for mishaps and failure potentially ruining a lesson or disrupting learning for the class. I recently experienced this twice within the same week during my Pathway placement.
The first mishap occurred during the use of this website http://www.learnar.org/bio_organs_demo.html and it's augmented reality software. The technology is simple enough, the user prints out a marker (essentially a black shape on a white background) that is easily downloaded as a .pdf file from the website. The software then uses the marker, picked up by the laptop/P.C. webcam, to place an image on the screen over the user being recorded by the webcam. This particular example uses this technology to place an accurate depiction of the vital organs onto the torso of the user. I thoroughly tested this kit both at home and at the school, using two seperate markers and the same laptop and it worked perfectly. However, during the lesson, for some undiagnosable reason, the technology failed and did not function at all. I quickly made amendments to the lesson and everything passed smoothly, however, this was a disappoint as I felt it is another great tool to demonstrate the placement of the vital organs and I didn't have time during the rest of the week to utilize this with the class.
Secondly, I planned to use the school's newly acquired netbooks and upgraded Wi-Fi for a group of children to research how heart rate alters with age. Unfortunately, this plan was scuppered when the Wi-Fi unexpectedly completely dropped for half a day with my lesson right in the middle of this. Again I had to adjust the activity but was again disappointing that I had to do this.
This goes to show that no matter how well prepared your ICT resources may be and how competent one may be with ICT there is always potential for failure!
I encountered Google SketchUp in Year 5 during my pathway placement. SketchUp is a 3D modelling program for use in civil and mechanical architecture and video game design. The program is available in its professional capacity but also available as a free download (http://www.sketchup.com/intl/en/product/gsu.html).
The children I was working with were using the program to develop a simple house structure which they could then decorate with items from the 3D Warehouse, examples included cars, helicopters and water slides. Some examples of more complicated structures that can be made using SketchUp are displayed below. This activity was very useful for the children, they worked in pairs following a set of instructions in order to create the correct dimensions and proportions. However, they were various avenues for creativity and individuality within the design of their house. An excellent and possibly brilliant cross-curricular link is the ability to place the creations within Google Earth, although I did not see this in use. The best part of SketchUp is the end goal that the children produce after much effort is very rewarding.
Finally, I believe this program should potentially be a staple in primary classrooms. The advancements in 3D printing and associated technologies means that this type of technology will become far more prevalent in the near future. As discussed during the PGCE taught course when teaching primary aged children we are preparing the workforce of 10-20years in the future, a tough task as we cannot predict what technologies will have been developed and what the children in your class will be using these for. Programmes such as SketchUp will hopefully be this bridge to the future.
 Sorry for being a little bit off topic again but this is fascinating.
The picture to the left shows a method of understanding multiplication used in primary schools in Japan. While we have covered many different methods of calculation on the course so far I have not seen this one mentioned before by anyone and I find it rather peculiar and fascinating that another country has a completely seperate method for teaching multiplication. Different education models and methods are of great interest to me and surely the most effective way to improve teaching practice is to 'magpie' the very best methods.
To explain the method above for the example above,
1. Draw a line to represent the tens in the 13 in a colour and a direction.
2. Draw 3 lines to represent the units in the 13 in a different colour but in the same direction as the previous line.
3. Draw a line to represent the tens in the 12 in a 3rd colour and in a different direction to the previous lines.
4. Draw 2 lines to represent the units in the 12 in a 4th colour and in the same direction as the previous line.
5. Add the number of intersects between the lines representing tens = '1' this is the number of hundreds.
6. Add the number of intersects between the all the tens and units lines = '5' this is the number of tens.
7. Add the number of intersects between the units lines = '6' this is the number of units.
Answer = 156.
I think this method would work extremely well for some more 'tricky' multiplications and may well create a short video to demonstrate this method in the near future.
 Slightly off topic but I used this analogy this past week during a University tutor group meeting, which was subsequently passed on and used very well again during the 'Deluxe lesson' seminar, and thought it was well worth sharing. Although, the title is equality and justice, I feel this perfectly encapsulates the need to treat every pupil as an individual, with individual needs, and not to treat everyone equally in any matter within the classroom, be it behaviour management, learning style, learning content etc.
Mathematics Magic
A short video highlighting how I used the Interactive Whiteboard and Smartboard software for a fun lesson aimed to bring to a conclusion a block of Mathematics word problems for a Year 4 class during my Guided Professional Placement using some 'Maths Magic'. These captured the imagination of the children but it also highlighted their ability to follow spoken or written mathematical word problems. The feature I used for this was the reveal feature, which was also used in the Literacy videos I posted previously. This feature allows the teacher to hide certain parts of pages on the IWB and then reveal the information vertically or horizontally. Although not specifically used in this way during the mathematics video the most important way to utilize the reveal feature is to draw attention to specific areas of a text or image (the spotlight tool can work in a similar way). I also feel the reveal feature can add a sense of mystery and excitement to a lesson, children are curious and if something is hidden from them they are likely to take a keener interest in it and engage more in order to find out what is hidden from them.
http://www.youtube.com/watch?v=tCtmMLVpBWA&feature=youtu.be&noredirect=1
Literacy ICT Examples from Guided Professional Placement
Please find below a host of links to videos I have created to explain some of the literacy activities that had elements of ICT involved. All the videos have a short explanation on the Youtube page.
Alphabetical Orderhttp://www.youtube.com/watch?v=X8IJ2sbHpi0&feature=youtu.be&noredirect=1Autumn Leaves Poemhttp://www.youtube.com/watch?v=bRIo8YaZvw0&feature=youtu.beHaunted House Creative Writinghttp://www.youtube.com/watch?v=gi_wxuX5pRc&feature=youtu.beHomophoneshttp://www.youtube.com/watch?v=ymHnay-1-Gc&feature=youtu.beFurther Homophones exampleshttp://www.youtube.com/watch?v=8xNaw1o9iMQ&feature=youtu.beInstructional Writinghttp://www.youtube.com/watch?v=q-eTvqJhXLw&feature=youtu.beMetaphorshttp://www.youtube.com/watch?v=Y7g3wBEQKOY&feature=youtu.beAll of these activites made use of the interactive whiteboard and Smartboard technology, most of these activities could have been completed using a standard whiteboard, however the IWB allows for a more interactive approach, in my opinion. Two of my favourite features are the 'allow move' and '2 page view'. The 'allow move' feature (see the homophones and alphabetical order videos) takes some time to set up - you must group what it is you want to to be able to move and then set the item to 'allow move' and if you have any text that you don't want to move (as in the homophones videos) you must set this to 'lock' - however it is well worth the effort. The features means that you can avoid the perils of doing a fill the gap activity on a regular whiteboard where children struggle to write clearly and quickly on the board, and may even be fearful of doing this, by letting them move pre-written text to the correct place. Furthermore, it allows chilren to make mistakes, and after questioning or further scaffolding easily correct them - less fear means more productive learning. Furthermore, even the lower achieving and shyer members of the class were very eager to come up and give this a go. The '2 page view' as used in the instructional writing video allowed me to display 2 longer pieces of information on the board at the same time that the children could refer to while comleting their task, in this case the 6 key points to instructional writing and the list of class generated time and instructional words. This has the advantage over the regular whiteboard that may be have a constricted space. Further to this, you can quickly switch between pages with different information if needed without having to wipe or write anything. The most common feature I used was the ability to write over a text using the whiteboards pens. This was highly useful for having pupils identifying key features of different types of writing and again shares many of the benefits of the 'allow move' feature compared to regular whiteboard.Of the negatives of using the IWB, the main one I encountered was the difficulty some children had manipulating the board, however, I expect this to change over the coming years as pupils become more and more accustomed to their use. Furthermore, as you can see in the video, writing on the IWB is not as neat as on the regular whiteboard - however, possibly using the 'convert to text' feature may be a useful way of negating this. Overall, the IWB provided me with alot of useful features particularly in efforts to make potentially dry subjects, such as alphabetical order, more engaging for all st
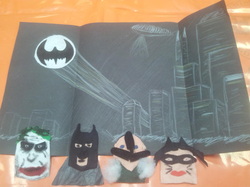 A less serious post before I get down to some the more serious content ('Why so serious?'). During the PGCE course we have had many opportunites to get creative and attempt to express ourselves. To the left is a finger puppet and background activity where my group decided to use theme of the popular Batman 'Dark Knight' trilogy. From left we have The Joker, Batman, Bane and Catwoman. This was a fun, highly engaging and quite simple activity that could be adapted for any literacy activity pertaining to stories or creative writing. While it could potentially be used in other subjects, that closely tie in with literacy, such as the humanities.
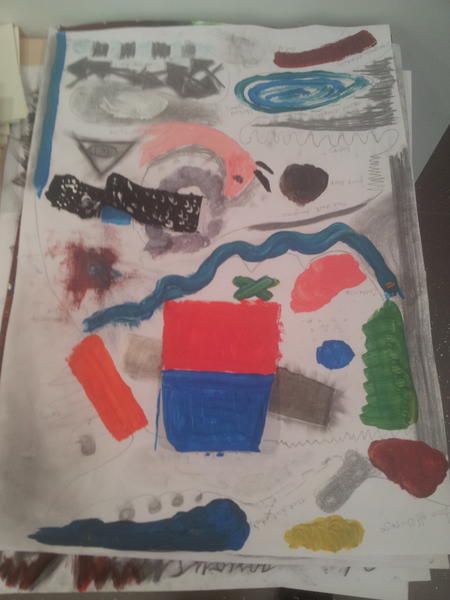
Below is an art piece that I created during the 'Health and Fitness' theme week. The activity was designed to explore mental health, particularly regarding our . I'm not so sure what this picture says about my mental health!
I have attached a lesson plan I utilised during my Guided Professional Placement that was based on the use of www.allaboutexplorers.com and was designed to demonstrate to the children that they must be more discerning in their research. This is particularly relevent in this era of readily available information and corresponding mis-information. This lesson worked particularly well from the ICT competency standpoint. As well as demonstrating how different sources of information, particularly on the internet, can differ; it also demonstrated how children can use important techniques, that perhaps we can take for granted, to make working with computers more efficient such as selecting text, copy/cut and paste. Feel free to use the lesson plan, it fits in particularly well if you are doing a historical, exploration or pirates topic!  | lesson_plan_ict_22.11.12.docx | | File Size: | 25 kb | | File Type: | docx |
Download File
 Early in the course we had to team teach a series of phonics lessons. During this time I, along with the two other members of my team, used the Letters and Sounds website and it's phonics games in order to engage the children in the lesson. The website is well arranged into phases and then introduction, resources and games. The games are all very simple to use and brilliant for use on a touch screen interactive whiteboard where the children can take more independence with the games. The games cover all areas of phonics including sounds, rhyme, real and nonsense words and all phonemes and graphemes.
 http://www.letters-and-sounds.com
|


 RSS Feed